# Installation and Configuration
## Pre-requisites
To successfully integrate using Netacea, you will need:
1. An AWS account with administrative privileges for Lambda and CloudFront.
2. A working Amazon CloudFront distribution.
3. Lambda code file (.zip) - provided by Netacea\*
4. Details of the relevant API and Secret keys, and a Kinesis endpoint - provided by Netacea.
{% hint style="info" %} \*The .zip file that Netacea has shared with you contains the code dependencies, the three Lambda functions and the configuration file NetaceaConfig.js which should be populated with the details of your integration with Netacea.
{% endhint %}
## Creating the Lambdas
To Start creating the lambda functions, first log into the AWS console and navigate to the 'Lamba' application. This can be completed by running a search from within the UI for 'Lambda'.
Once there please check that your location/region is set to `us-east-1.` If not, please change it to this, Lambda functions must be created in the `us-east-1` AWS region, otherwise they will not be available for use with CloudFront.
### Create Function
Netacea require 3 Lambda functions for this integration and this can be completed by following the steps outlined below. you will need to repeat this process for each Lambda function.
#### Creating the Function
To start creating the function, click the create function button, located in the top right hand corner of the UI
Once you have done this, you will be presented with the below screen.
Please select 'Author from scratch' and then name the function. Netacea suggest that each function be named after each function type, prefixed with 'netacea\_' Examples of these can be found below:
* netacea\_origin\_response
* netacea\_viewer\_request
* netacea\_viewer\_response
Each function should be created with the default settings under "Basic Information"
Create Function Example Screenshot
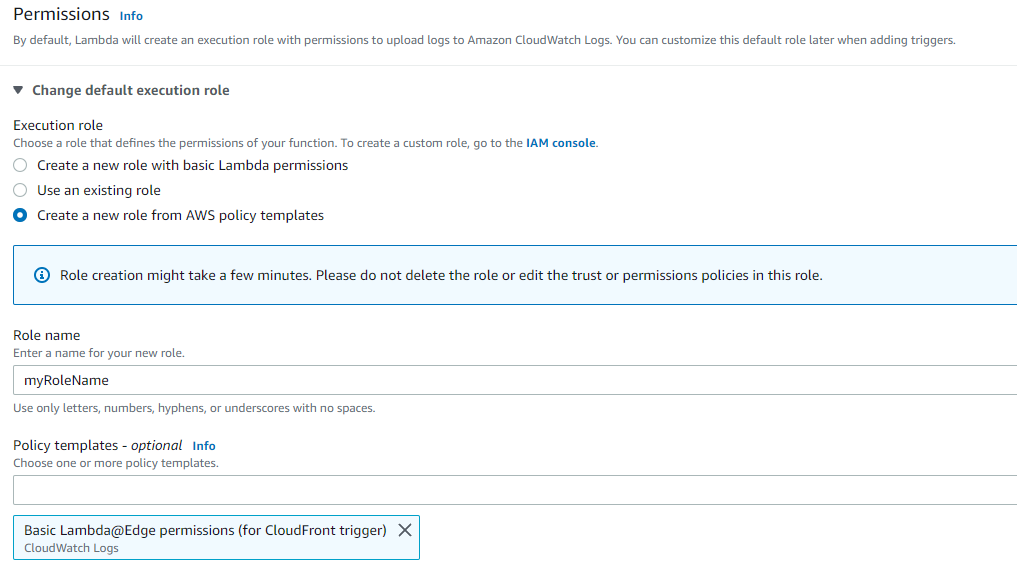
#### Permissions
When creating the Lambdas, it is important ensure they have the correct **default execution role**. The policy it should contain is **Basic Lambda\@Edge permissions (for CloudFront trigger)**. If there is no role with this policy, one will need to be created. Please see below:
Permissions Example Screenshot
#### Uploading the Zip File
Once the Lambda function has been created, the Netacea code will need to be added by uploading the supplied zip file. This can be downloaded from the Netacea Admin Portal.
Upload the Netacea supplied zip file.
Upload the zip file
Once the file has been uploaded to the function, open the `NetaceaConfig.json` from the code source UI and populate it with the details provided to you by Netacea.
For more information regarding each attribute in the config file, please see below:
The code snippet below shows the `NetaceaConfig.json` file discussed above. This must be populated with the details Netacea has provided for your organisation. This can be copied and pasted with all the relevant details from the Netacea Admin portal.
{% hint style="info" %}
The attribute `mitigationType` is used to determine the mode of the integration. This can be one of three values:
* "**INGEST**" - This integration mode is monitoring only, meaning that no mitigation actions will be executed. This is recommended during POCs.
* "**MITIGATE**" - This is the "normal" integration mode, meaning that the Netacea solution will monitor and actively mitigate requests.
* "**INJECT**" - This mode is used in custom solutions in which the mitigation action by Netacea will only be a recommendation using HTTP headers added to the request.
{% endhint %}
{% hint style="danger" %}
The last three configuration variables are used to increase security by concealing Netacea's default cookie names and values from public view.
{% endhint %}
Once the `NetaceaConfig.json` code has been updated, click the **Deploy** button to save your changes.
#### Edit Runtime Settings
The Runtime settings will need to be updated.
Edit Runtime Settings
Scroll below Code Source to the Runtime settings section and click the **Edit** button.
Here, change the default handler from `index.handler` to the relevant function's name you are creating (e.g. use `OriginResponse.handler` for the *netacea\_origin\_response* function) . Use the below list to correlate the function name with the correct handler function:
* netacea\_origin\_response -> `OriginResponse.handler`
* netacea\_viewer\_request -> `ViewerRequest.handler`
* netacea\_viewer\_response -> `ViewerResponse.handler`
Once the correct handler has been specified, click **Save**.
#### Adding the Triggers
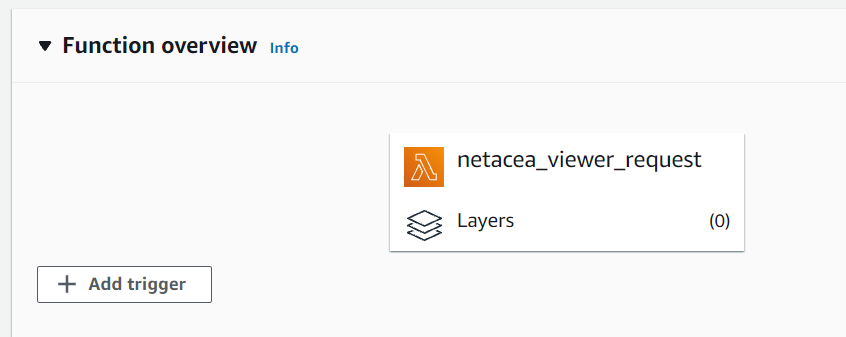
Once the changes have been saved and deployed, a CloudFront trigger needs to be added to the Lambda function. This allows the CloudFront distribution to execute the Lambda.\
\
At the bottom left of the **Function overview** section, click Add Trigger.
A **Trigger configuration** page will be displayed, where the option to select a trigger from the dropdown will be presented to the user. For the source, select CloudFront.
Select **Deploy to Lambda\@Edge** and select the correct distribution, and CloudFront Event, which will be the **same name as the function you just created** (e.g. Viewer Request).
{% hint style="info" %}
For the **Netacea\_Viewer\_Request** based event, it is required that you select the option to **Include Body**.
{% endhint %}
Select **Confirm deploy to Lambda\@Edge** and then click **Deploy.**
Once deployed, this will create a new version of the function and associate the CloudFront trigger. This function will be replicated across all regions and the associated distribution will be updated also.
{% hint style="warning" %}
Please ensure the above steps for creating the function and adding a trigger have been completed for each Lambda\@Edge function (**netacea\_viewer\_response**, **netacea\_viewer\_request**, and **netacea\_origin\_response**)
{% endhint %}
### POST Method
The Netacea Lambdas also require the ability to perform POST methods as part of our Captcha challenge. To enable this, please navigate to CloudFront within the UI. This can be done by running a search for 'CloudFront' within the UI
Search for CloudFront
One within the CloudFront application, select the distribution that the Lambdas are going to be used with. The please select 'Behaviors'
Behaviors
Then select the default behaviour and click 'Edit' within this page there will be a section titled 'Allowed HTTP methods' if not already selected, please click the radial button next to 'GET, HEAD, OPTIONS, PUT, POST, PATCH, DELETE'
HTTP Methods
You should also be able to see the **Function associations** at the bottom of this page. This shows the Function Type (Viewer request, Viewer response, Origin request) and their associated Lambda\@Edge function. please ensure that 'Include body' is ticked for the 'Viewer request' function.
Please then select 'Save changes'
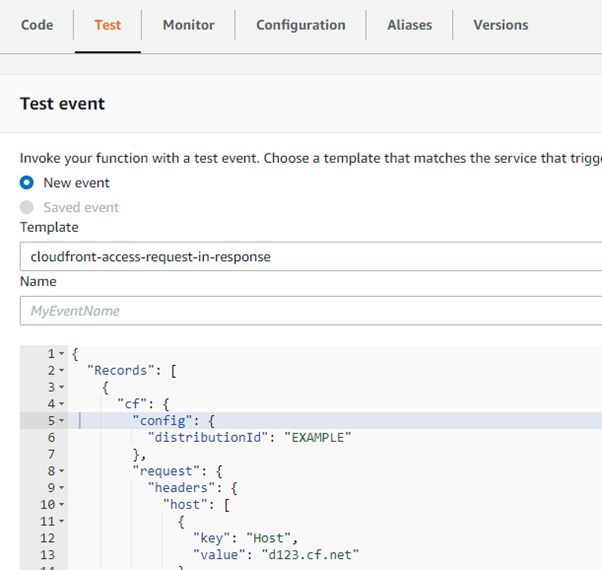
### Testing
To test the Lambdas, select the **Test** tab and create a new event.
### Finishing Up
Once the the above steps have been completed and the functions are deployed, the Netacea plugin will be active.
Please get in touch with Netacea to discuss the next steps and ensure the implementation of the integration with Netacea has been successful.
.png?alt=media)
.png?alt=media)
.png?alt=media)
.png?alt=media)
.png?alt=media)
.png?alt=media)
.png?alt=media)
.png?alt=media)
.png?alt=media)

.png?alt=media)
.png?alt=media)
.png?alt=media)